It’s an old fashioned, made by hand recipe (with a food processor option as well) that’s a million times better than store-bought and worth every ounce of effort.
My Idea of the VERY BEST Homemade Pie Crust
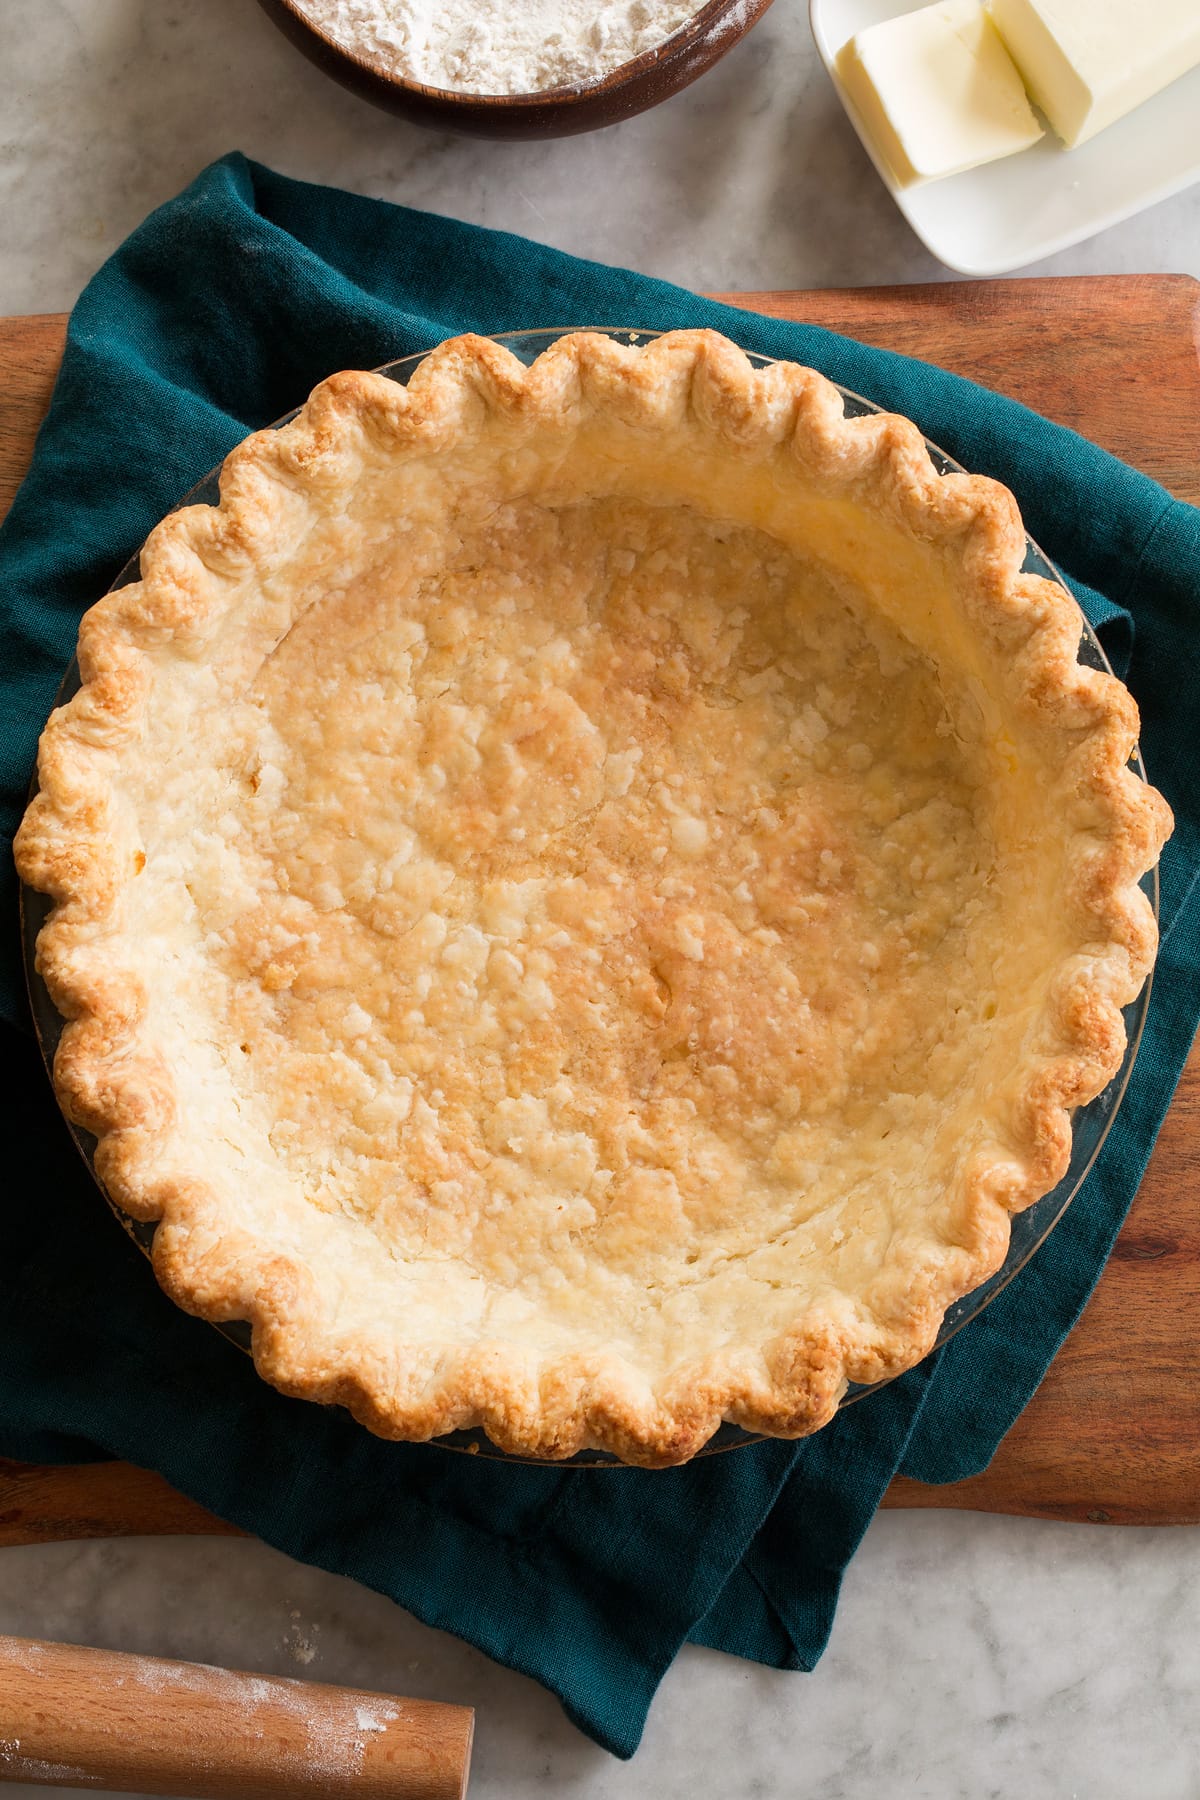
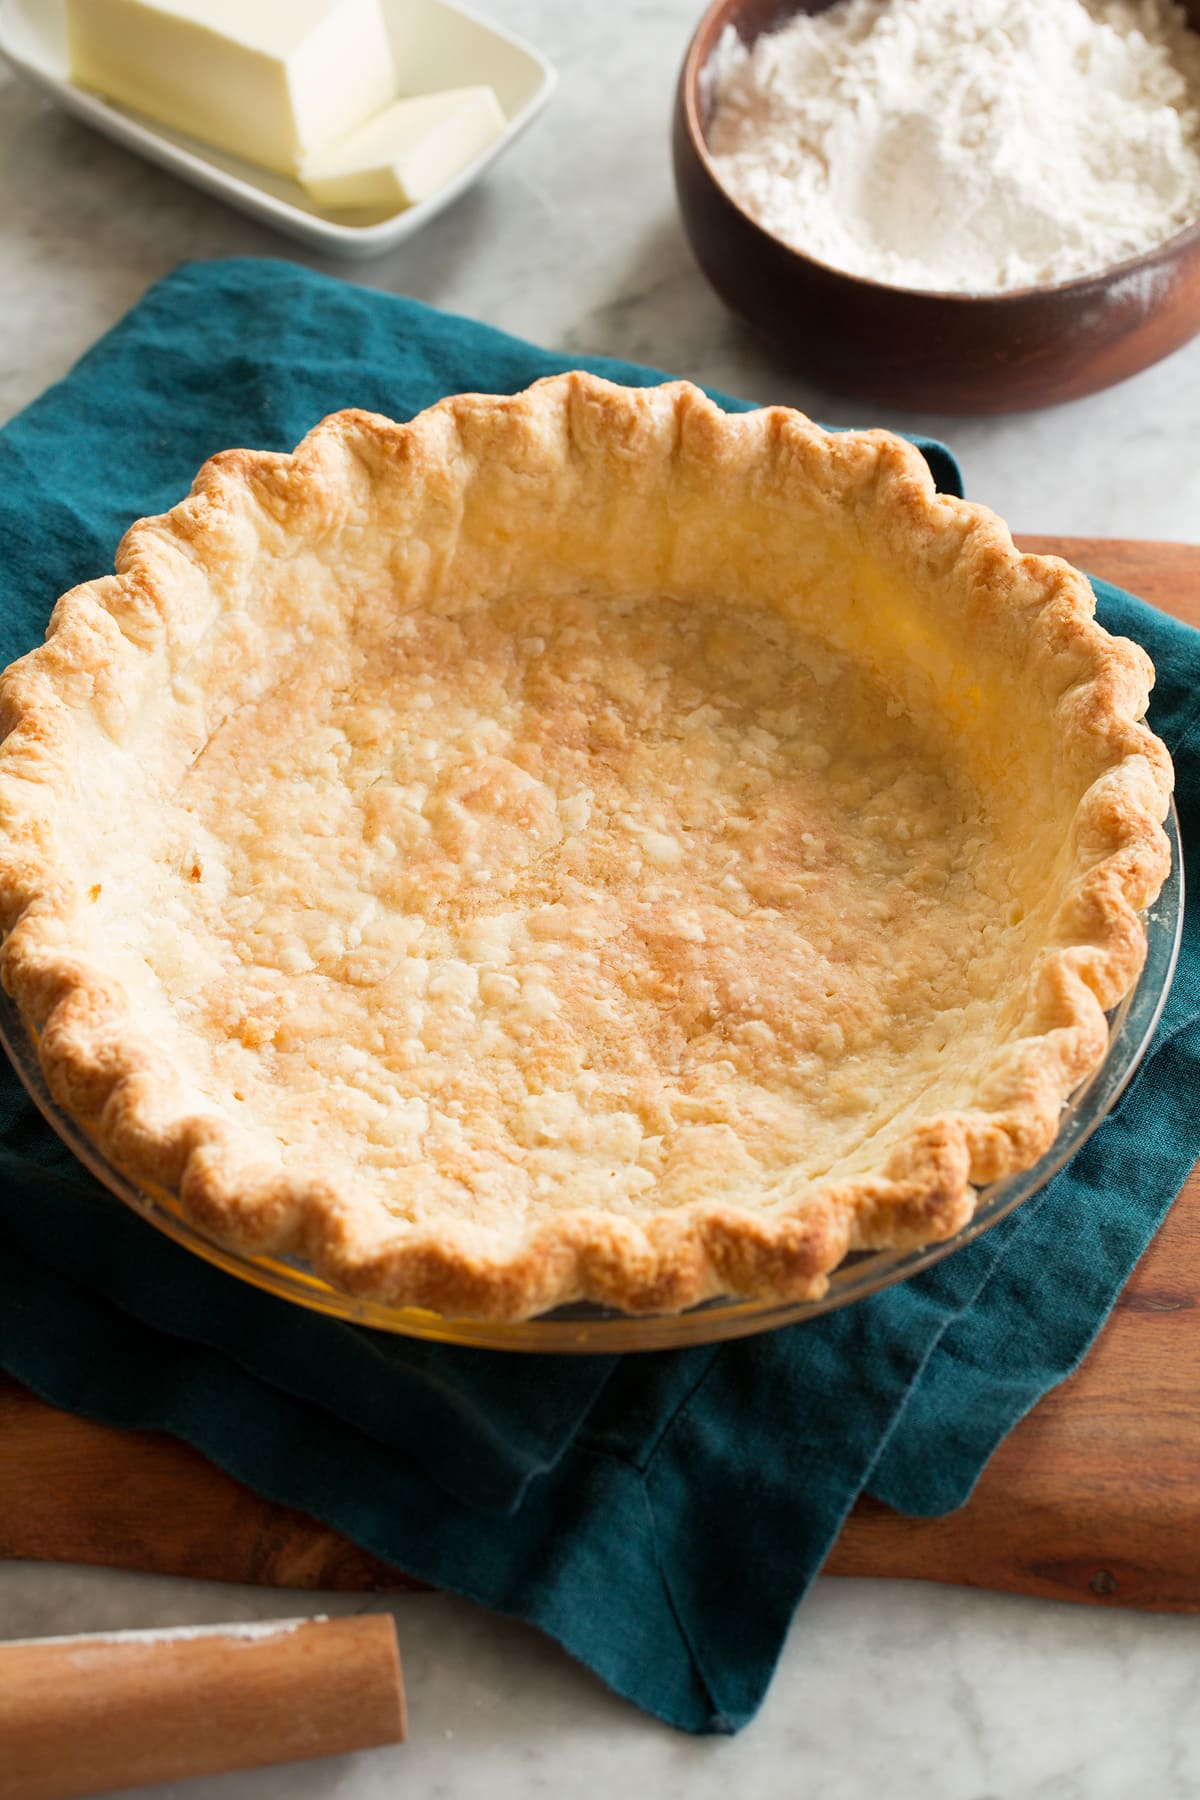
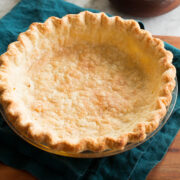
Ah the humble pie crust made with the most basic ingredients yet it’s always something (when done right) that leaves people smitten. I’ve made countless pie crusts over the years and it wasn’t until this past year (after I made 15 or more crusts in a few weeks, I’ve been annoyingly obsessive about it) that I finally felt I could make the best pie crust we’ve had. Just how good were they? They tasted incredibly delicious bare without the need of a filling. Many of them we were breaking off generously sized, super flaky pieces before they had a chance to be filled. My mom finally gave me the ” this is better than mom and grandma made” approval so I knew I’d finally gotten in right. I hope you love it as much as we do in all it’s glorious, golden brown, tender, buttery deliciousness! It is one of those things that takes some practice but to get a great head start I’ve listed a step-by-step photo guide and have shared many tips for success so you can have a picture perfect pie crust you’ll be proud of this holiday season! There are also directions included for making the pie dough in the food processor as well if you’re interested (personally I favor the handmade option, but let us know which you like best!).
Tips for Making the Best Pie Crust
The butter:
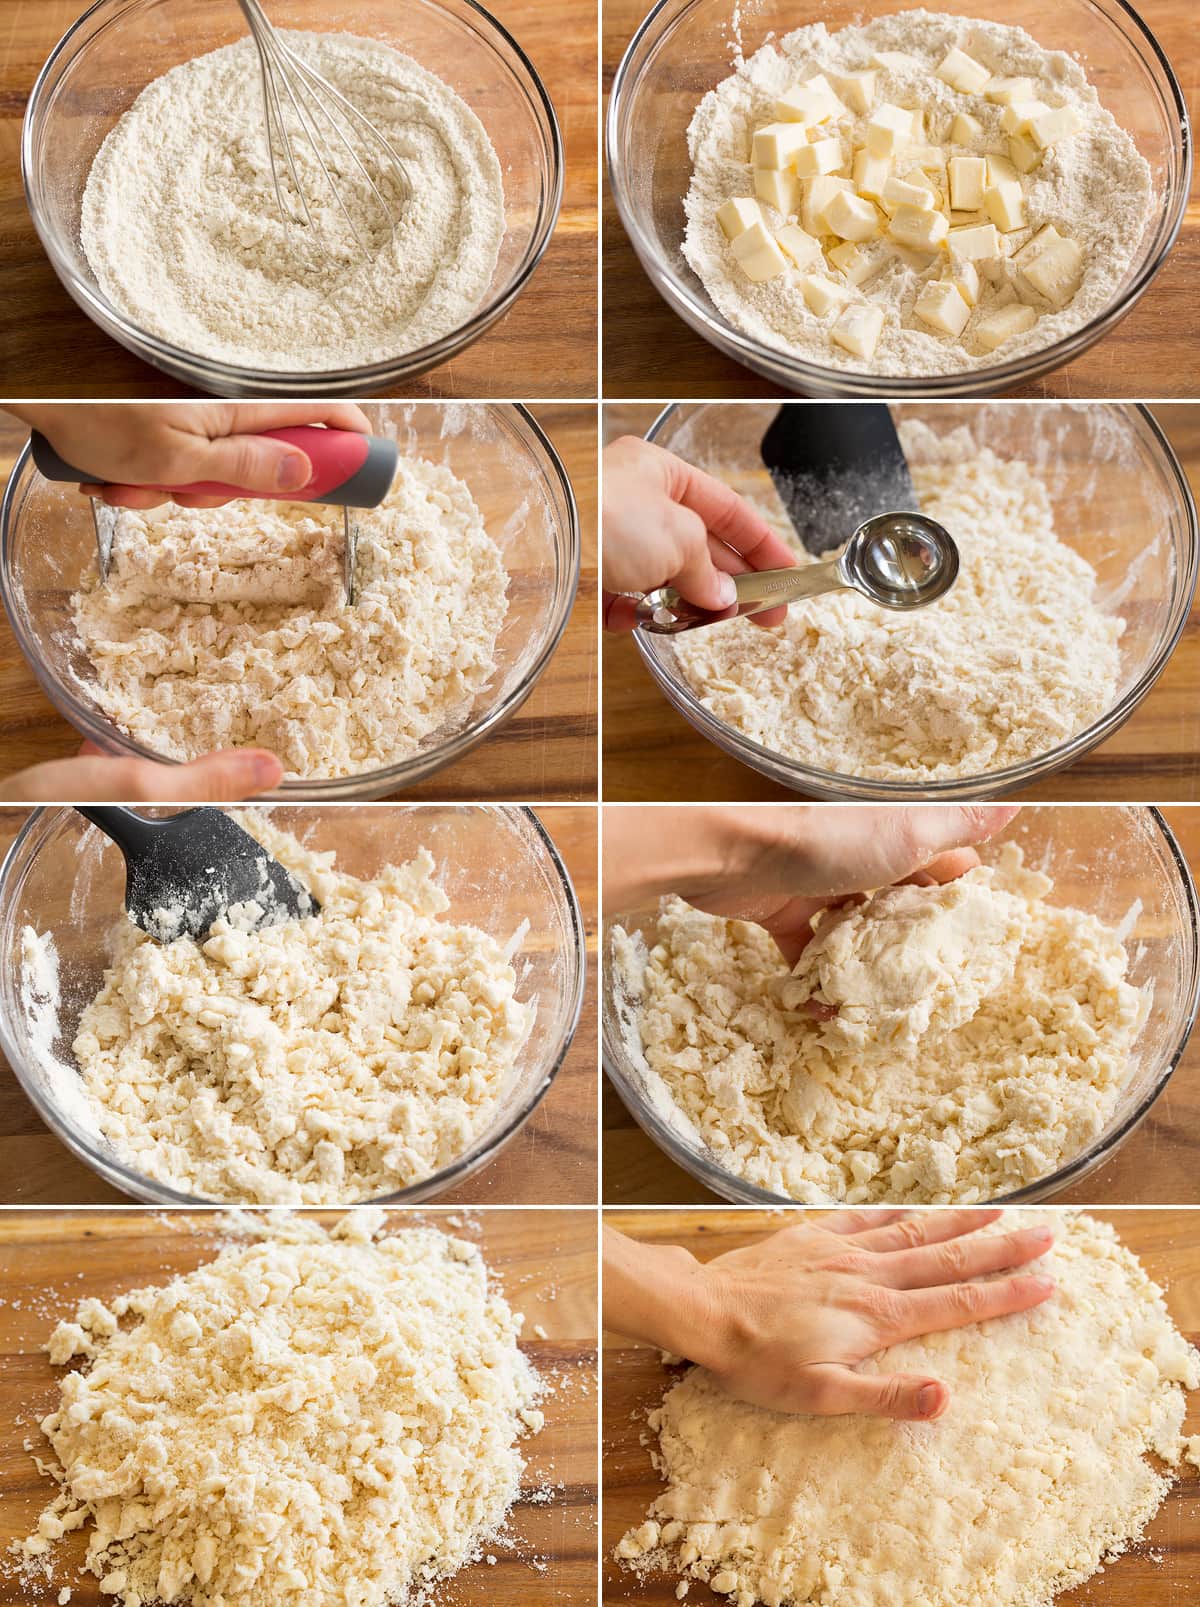
Be generous with the butter! It gives the pie crust a delicious rich flavor. Having the right ratio keeps the crust from tasting floury. Use very cold butter, it will keep it from melting right into the dough and creates wonderfully flaky layers. Stick with unsalted butter. It doesn’t melt as quickly as salted butter, plus by using unsalted you can control exactly how much salt goes into the recipe. In warmer climates you may find freezing the butter for 20 minutes beforehand works better. Work quickly. If you find butter is softening then chill intermittently through process as needed. Cut butter into flour just until you see pea size and double pea size clumps, this equals more air pockets and some slightly higher flakier layers. Less butter clumps throughout makes a denser dough. Bake with the pie pan set one a baking sheet so it catches buttery drips over the edges so they don’t end up at the bottom of the oven.
The water:
Only use very cold ice water. Fill the water with plenty of ice about 10 minutes before you plan on using it. Again it’s all about a cold dough. Be sure there’s no ice cubes in the water you measure out or you’ll end up with a pocket of water in the crust once it melts. Water amount needed can vary based on altitude, brand of flour used, and climate, among other things. So with that said just be mindful when adding the water that you add just barely enough to moisten the dough so your crust doesn’t end up oversaturated and soggy (we want crisp and flaky crust right?). It should just hold together when you clump up a portion of it in your hand.
The process:
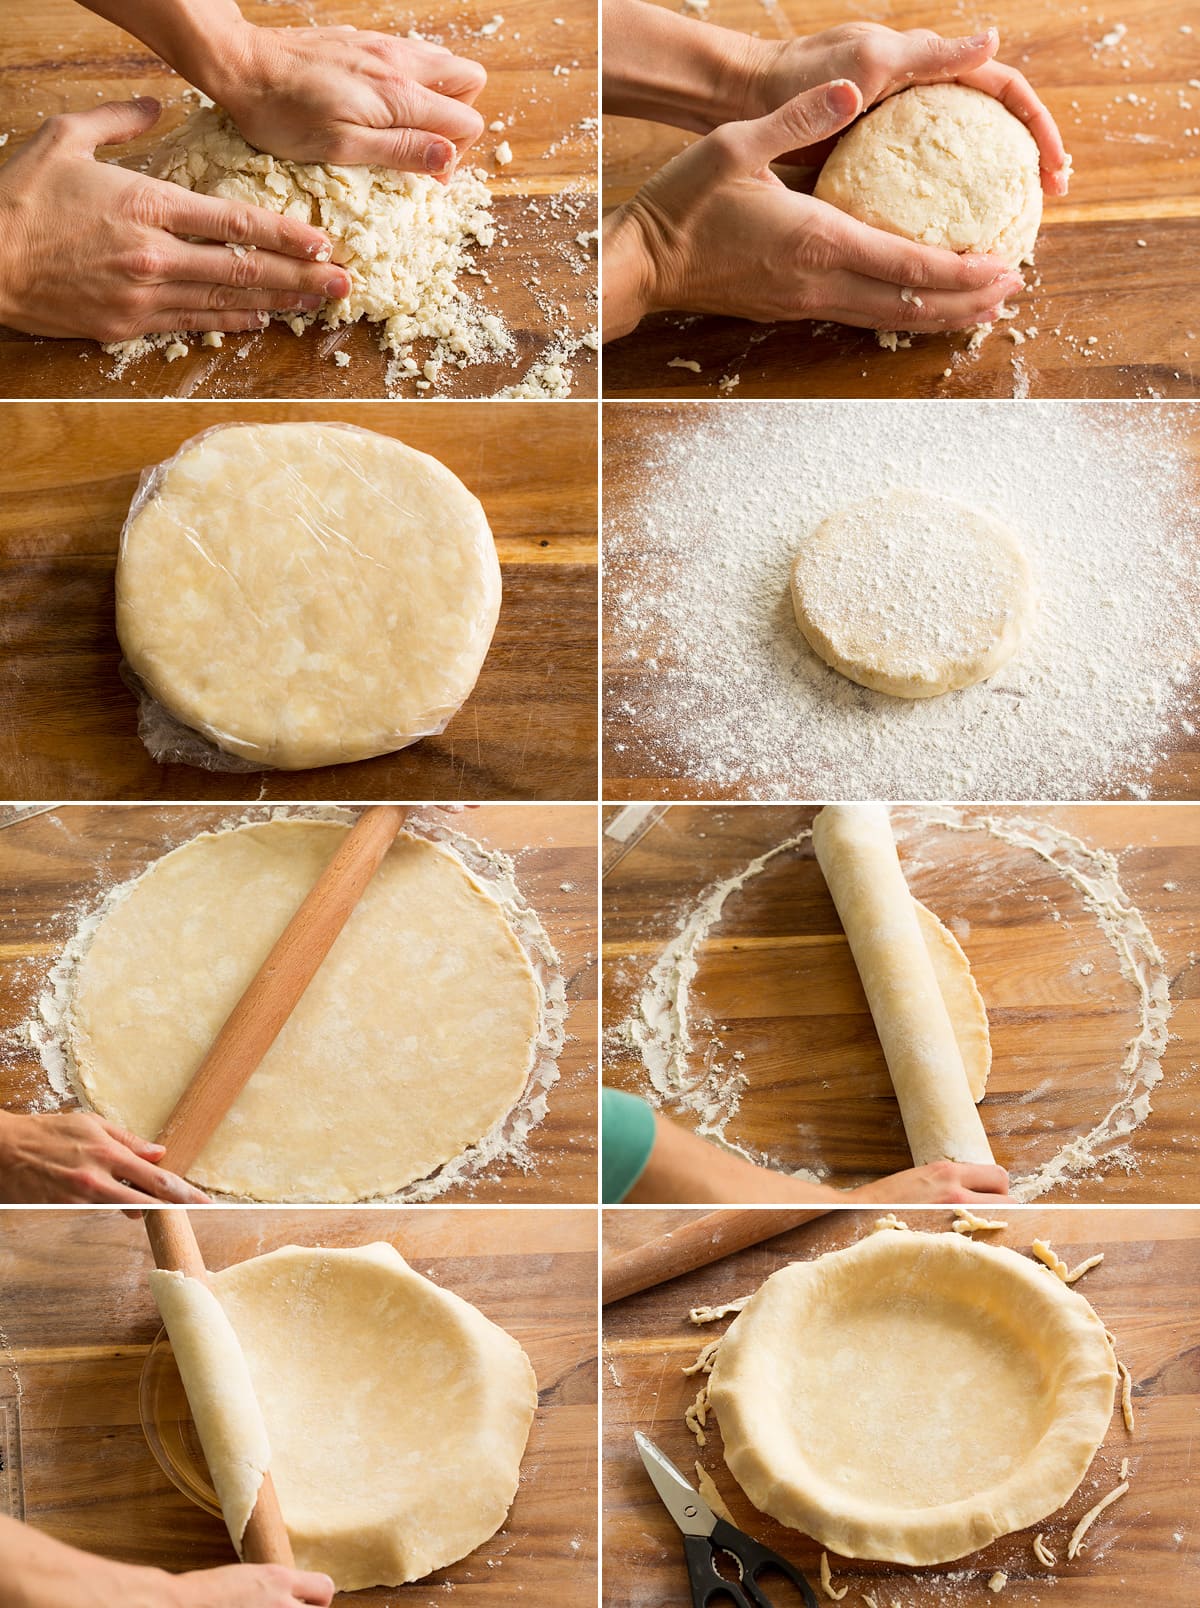
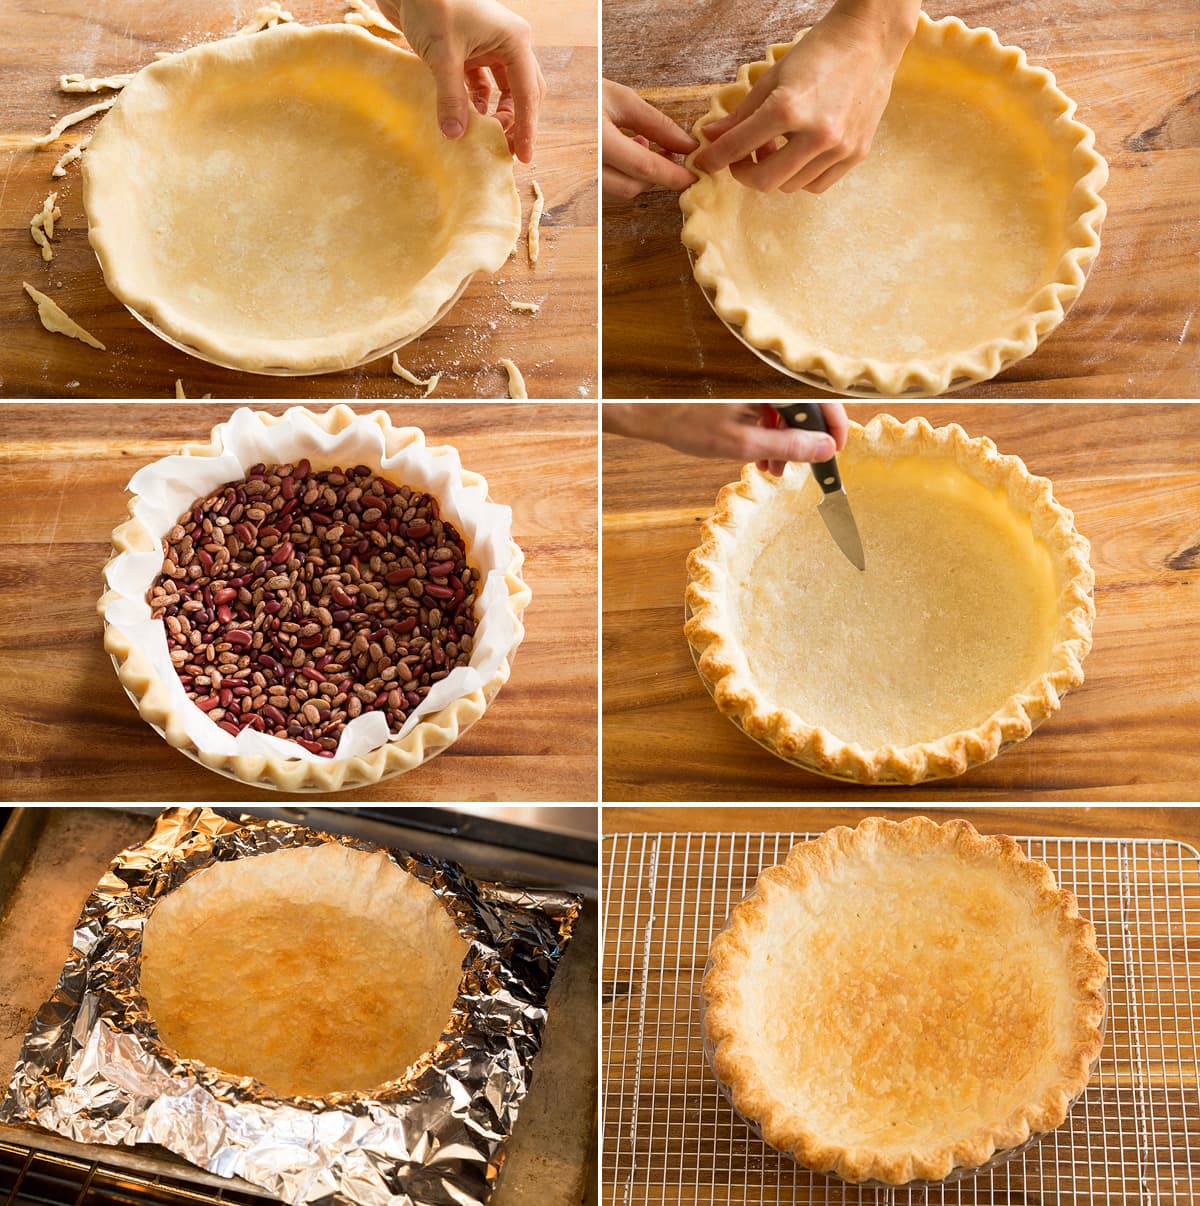
Don’t over-work the dough so it’s more tender. You’ll have to compress it together but you don’t want to knead like a pizza dough or bread dough. Just turn it enough to bring it together. Pinch and seal any cracks you see before chilling. They spread a lot when rolling and it’s just easier to deal with them beforehand. Even still there will likely be some smaller ones when rolling so pinch them back together. Rest the pie crust dough in the fridge. It allows time for the water time to hydrate the dough and evenly distribute throughout, it also allows time for the gluten to relax making it easier to roll. Use a fair amount of flour when you roll out your dough (both below and sprinkling over it) or those buttery streaks can stick to the surface. Some people like to lift the dough and turn as they roll it out which is another option as well but I skip this. Work quickly when rolling, and when shaping the pie crust into the pie dish. Again it’s all about keeping it cold and not over-working it. Pie crust should be rolled out to about 1/4-inch thick and usually a few inches wider than your pie dish you’re using. I like to allow a generous overhang of dough along the edges of dish, then tuck that under creating a nice flaky rim with lots of layers.
More Helpful Tips
Depending on the type of pie your making (such as apple pie) you may find it works better to bake on a lower rack of the oven so that bottom crust can get more browned and crisp. Pierce the bottom of the pie crust with a pairing knife about 10 times when blind baking (after removing pie weights) to prevent large air bubbles. Just don’t overdue piercing it because we want small air bubbles in there. Use a pie shield so your crust edge doesn’t over-brown or use a ring of aluminum foil. Bake on a pre-heated baking sheet as it gives the crust a head start so it can get more crisp. With a juicy filled baked pie (such as fruit or pumpkin pie) you can partially blind bake before filling (bake it 375 about 20 minutes with the parchment paper and pie weights then uncover, pierce and bake 10 more before filling). If you want a richly golden brown crust you can brush with egg wash (whisk 1 egg with 1/2 Tbsp water and brush over crust with a pastry brush). You can even do this with the blind baked option, just brush over gently after you remove the parchment paper and pie weights before the second baking.
Pie Crust Recipe Ingredients You’ll Need
Butter: Don’t attempt to use margarine, shortening or lard here, it won’t work the same in this recipe. All-purpose flour: I recommend using unbleached flour. Bleached flour has a more pronounced flavor that would stand out here where so much flour is used without many other flavors to mask it. Salt: Just standard table salt is needed. If you like less salty crust use 1/4 tsp if you prefer the standard slightly overly salty crust use 1/2 tsp. I prefer right in the middle. Sugar: This will encourage browning and help tenderize the crust. Plus it adds a hint sweetness of course. Ice water: Just fill a bowl with a fair amount of ice then add some water (maybe about 1 cup of each), rest a while or stir stir stir for a minute. Use the amount listed from the recipe below, you’ll have lots leftover.
Tools Needed to Make Pie Crust
Pastry blender: This is used to cut the butter into the flour. I favor the ones like this with a rubber handle. Or you can use the food processor option and you don’t need a pastry blender. Kitchen scale: I recommend a kitchen scale for the most accurate results, though measuring cups will work just be sure to measure as noted (using scoop and level method for the flour). Mixing bowl: It doesn’t need to be anything fancy just something large enough to hold the volume of ingredients with extra space for mixing. Something like these. Rolling pin: This type here works great. Pie dish: I recommend a glass or metal pie dish. I use this standard size and this deeper dish. Ceramic pie dishes conduct heat slowly and don’t brown or cook as evenly. Pie weights: You can use the real deal pie weights (you’d need about 4 packs) or just use dry beans or even sugar. I usually just go with dry beans.
How to Make Homemade Pie Crust from Scratch
What is Blind Baking a Pie Crust?
Blind baking is a method of pre-baking a pie crust without any filling it. It can be fully baked or partially baked depending on the type of pie. A pie crust is first chilled in the pie pan to help set it so it doesn’t shrink as much. Then it’s lined atop with parchment or foil and filled with weights, this helps keep the pie crust from shrinking (such as melting and sliding into the center of the pie pan as it bakes). It bakes this way for the majority of the time, then the parchment with the weights are removed so the crust can dry, brown slightly, and bake fully uncovered.
How to Blind Bake Homemade Pie Crust
How to Make a DIY Pie Shield
Before you being baking the pie cut out a 14 by 14-inch sheet of heavy duty aluminum foil. Place a standard 9-inch pie plate in the center of the foil and use the pointed edge of closed scissors to trace a circle around the bottom edge of the pie dish (you can do it just a little larger too if needed). Cut the interior circle and you’ve got a quick homemade pie shield. I’ve found this method works better than piecing together a foil ring from several sheets and the heavy duty foil doesn’t tear as easy or blow around as easy in the oven. Cover your pie crust edges once they’ve browned to your liking with the foil ring then crumple a few of the outer edges under to help it stay in place.
Pie Dough Storage
This pie crust dough will keep wrapped in the plastic wrap in the fridge for 3 days before baking. Just rest at temperature for about 10 minutes before rolling (maybe 5 minutes if you house is very warm). Or freeze wrapped in foil in and an airtight container for up to 3 months. Thaw overnight in the fridge, then rest on the counter for 10 minutes before rolling.
Baked Pie Crust Storage
A fully blind baked (unfilled) pie crust will keep well at room temperature for about 3 to 4 days. Or freeze up to 1 month well wrapped. Just be mindful of it’s placement in the freezer as not to break it.
Tempting Pie Recipes to Try
Chess Pie Dutch Apple Pie Pecan Pie Pumpkin Pie or this streusel favorite Sweet Potato Pie